
(Not an OCU Plus user yet? Book a free app demo and upgrade to Shopify Plus and OCU Plus to use this new feature.)
Okay — why are we so hyped about the new In-Checkout Upsells?
Because our data shows that the more offers you make, the more you can increase revenue and AOV.
Which is why OneClickUpsell leverages a ton of offer placements, like:
- Pre-purchase upsells in the shopping cart
- Post-purchase upsells on conversion-optimized offer pages
- Thank you page upsells right on the Shopify thank you page
So what happens when you combine these offers?
Check this out: when OCU users offer both pre-purchase AND post-purchase upsells, they average 15% more upsell revenue than those who only offer upsells post-purchase!
And now, with our new In-Checkout Upsells, Shopify Plus stores* can make additional offers right from the Shopify checkout.
So yeah, we’re hyped!
We have a full case study coming soon, but this new placement is already showing HUGE potential.
Here’s how it works.
(*Because In-Checkout Upsells require modifying the checkout, this feature is available for Shopify Plus stores only.)
In-Checkout Upsells… In Action!
It’s super easy to set up OneClickUpsell’s new In-Checkout Upsells. Let’s go through it step by step.
Create Your Offer
Start by going to the Funnel Builder. Under the In-Checkout Offer section, click Create Offer.
Next, add a product. We recommend starting with one of your best sellers, or a product with inventory you want to move quickly.


Customize Your Upsell
On the left-hand side of the builder, you can set a discount for your offer using the Shopify “Compare at price,” if you’ve set one.

Plus, you can use the toggles to show or hide the Offer Description and show or hide the entire offer if it’s already in the customer’s cart.
On the right-hand side of the builder, you can edit the on-screen elements of this offer by clicking on them, including the:
- Offer Headline
- Product Name
- Product Description
- Call-to-action Button

Choose Upsell Placement
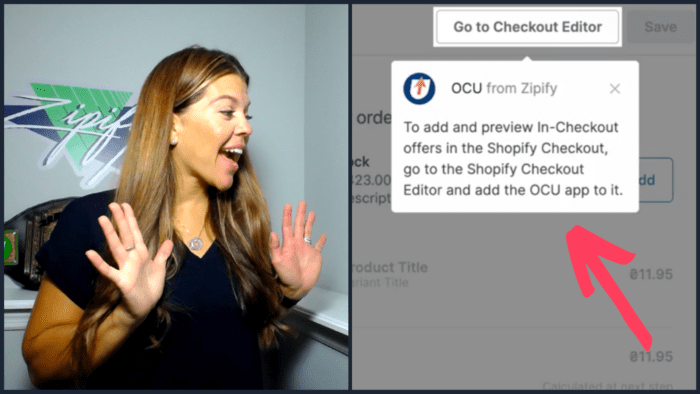
Next, click on the “Go to Checkout Editor” button to go to the Shopify Checkout Editor and choose your offer placement.
Go to the “Add apps” section on the left menu to add the offer to your checkout page and voila — there it is under the Offer Summary on the right!
To change the placement of where your In-Checkout Upsell appears on this page, just drag the OCU icon(s) on the left to set its place in the Order Summary.
You can even duplicate your offer (as I’ve done above) for more visibility. For example, you can include the offer at the top and bottom of the Order Summary!
Don’t Have the OneClickUpsell App?
It only takes a few minutes to install OCU, launch your first upsell funnel and start generating 10–15% more revenue.
It’s no wonder we’ve made our users an extra $400 million in sales!
Start your free 30-day trial in the Shopify App Store now.